Steps For Dryer Vent Cleaning Toronto

Contrary to its name, a dryer sometimes results in fully-dried garments. It might be time to consider dryer vent cleaning Toronto if your clothing remains consistently damp even after a full drying cycle or if your dryer runs hot to the touch outside.
Experts advise cleaning your dryer ducts at least twice a year. Although doing so might seem intimidating, there are simple, affordable, and effective ways to handle this chore independently. Read on to understand some simple steps to do dryer vent cleaning Toronto independently.
- Start By Finding Your Vent
It’s important to identify the dryer vent’s location before starting the dryer vent cleaning process in Toronto. The typical dryer exhaust pipe has a 4-inch diameter and connects to ductwork hidden within a wall. Through this pipe, the warm air from your dryer leaves through a vent on the house’s external wall.
After locating the external dryer exhaust chimney, look inside to see if there is any buildup of lint, dead insects, or even dust. Cleaning displays and eliminating obvious obstructions should also be part of this inspection.
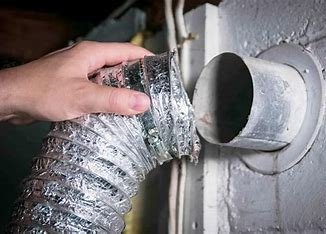
- Cautiously Disconnect Your Dryer
After understanding how your ducts work, it’s time to unplug your dryer to disconnect it. Remove any clamps or metal tape holding the dryer outlet channel to the exhaust afterward.
Use caution and light pressure when removing the vent channel from the wall tube to prevent breaking the pipe.
- Vacuuming The Lint
You should now be able to see clearly into your dryer chimney from your laundry room or other appropriate location at this step of the cleaning process. Remove any lint inside the opening or nearby using the hose add-on of a vacuuming tool or garage vac.
You can recap this procedure on the external duct if you have a portable vacuum. Otherwise, if a handheld Hoover is not available, clear the outside of any material by hand.
- Use A Brush To Clean The Inside
Before you place the brush end of the rod into your pipe, attach the dryer brush from your vent washing kit to your power drill.
Consider the possibility of maneuvering the hose attachment due to the direction your duct takes as you softly push the brush as far back into the duct as you can.
Consider inserting the brush head into the outer duct as an alternative strategy if you need help threading the brush through the entire length of your duct or if the brush doesn’t extend that far.
- Cleaning Up And Reconnecting
Now that you’ve finished cleaning the lint buildup from the dryer vent, if you remove the lint, you will not only increase the effectiveness of your dryer but also greatly lower the chance of a potentially hazardous fire hazard.
Using a vacuum, broom, and dustpan, you remove the remaining dirt and lint to achieve a thorough cleaning. After the mess has been cleared up, it’s time to put the pieces back together.
Reattach the wall duct and plug your dryer back into the outlet. There is, however, a very important factor to consider if your dryer is attached to the wall duct using a flexible foil-style vent. These vents have a reputation for being less sturdy and more likely to wrinkle or kink, which can restrict airflow and present fire concerns.
Replace the flexible vent with a more durable one to improve performance and safety. The best option is a 90-degree, fire-resistant aluminum elbow since it provides better airflow and reduces the possibility of lint buildup and subsequent igniting.
These elbows are inexpensive and easily accessible at home improvement retailers in most locations. By making this minor expenditure, You are proactively ensuring your dryer system’s ongoing safety and effectiveness.
- You Can Now Celebrate
At this step, you’ve finished cleaning out the dryer vent, a process that may not be glamorous but is crucial for the security and functionality of your house. You can be proud that you’ve taken a proactive step to avert potential dangers and enhance your dryer’s functionality as you turn on the dryer and hear the air moving smoothly through the vent.
You won’t struggle with moist garments or prolonged drying times anymore. Your efforts have paid off, and you are the only one who can take credit for this success.